Friday, March 18, 2022

CPRID_UTIL

If you have access to the Checkpoint smartcenter you have a powerful command to manage your firewalls 

This command is cprid_util and it uses the SIC channel established between management and remote firewalls

What you can do with this command is based on your fantasy

I am adding some commands I have collected so far but of course this is not exhaustive

I found this command looking at the script /opt/CPsuite-R77/fw1/bin/licenseDataCollector.sh from Checkpoint 

this command checks if you have access to a remote system

variable remoteServerIpAddr : firewall IP address


# test access

#

cprid_util -server $remoteServerIpAddr getarch &> /dev/null

if [ $? -ne 0 ]; then

   echo ${scriptName}: Cannot communicate with server $remoteServerIpAddr 1>&2

     # return an error value

     return 1

fi


Example: 


[Expert@srfacpmgnt1:0]#  cprid_util -server 10.39.35.10 getarch

gaia


You can send a script to the remote firewall to be executed locally


variables

 remoteServerIpAddr : firewall IP address

 scriptNameFullPath : full script path

 scriptName         : filename on remote server


# copy the command

#

cprid_util -server $remoteServerIpAddr putfile -local_file $scriptNameFullPath -remote_file /tmp/remote-command-$scriptName.$$ -perms 755

if [ $? -ne 0 ]; then

       echo ${scriptName}: Cannot copy script to server $remoteServerIpAddr 1>&2

        # return an error value

        return 1

fi


### some examples


cprid_util -server 192.168.1.1 -verbose rexec -rcmd bash -c "/bin/df -h"


Filesystem            Size  Used Avail Use% Mounted on

/dev/mapper/vg_splat-lv_current

                       32G   10G   20G  34% /

/dev/md0              145M   99M   39M  73% /boot

tmpfs                  32G     0   32G   0% /dev/shm

/dev/mapper/vg_splat-lv_log

                      146G   17G  122G  12% /var/log

## reboot machine

cprid_util -server 192.168.1.1 -verbose rexec -rcmd bash -c "/sbin/shutdown -r 0"


What if you need to create a user on a remote firewall

Easy>

### remote create user on gateway


1. create file with clish commands newuser.sh


add user myuser uid 0 homedir /home/myuser 

add rba user myuser roles adminRole

set user myuser gid 0 shell /bin/bash

set user myuser realname myuser 

set user myuser password-hash $1$i7VPfjkjug%fkPP00ddddsY7RVAG/K.

save config


2. copy file to gateway


cprid_util -server $remoteServerIpAddr putfile -local_file newuser.sh -remote_file /tmp/newuser.sh -perms 755


3. execute command


cprid_util -verbose -server $remoteServerIpAddr rexec -rcmd clish -f /tmp/newuser.sh 

Thursday, November 25, 2021

CHECKPOINT - NEW SMARTCENTER UPGRADE (FROM R80.20 ONWARDS)

Checkpoint has introduced a new mechanism to export smartcenter database ( from old migrate_export tool)

the script is in $MDS_FWDIR/scripts directory and is called migrate_server

see sk135172 for a complete reference 

here is a brief list of commands to verify upgrade feasibility, export and import

First you may want to check you have the script (in later versions you have it by default)

Run in the Expert mode:

cpprod_util CPPROD_GetValue CPupgrade-tools-<Version> BuildNumber 1

<Version> is the target version, to which you upgrade. One of these: R80.20, R80.20.M2, R80.30, R80.40, R81, R81.10

Example:
cpprod_util CPPROD_GetValue CPupgrade-tools-R80.40 BuildNumber 1

VERIFY
  • The Verify command should be:

    [Expert@HostName:0]# $MDS_FWDIR/scripts/migrate_server verify -skip_upgrade_tools_check -v <Target Version>

    <Target Version> is the target version, to which you upgrade. One of these: R80.20, R80.20.M2, R80.30, R80.40, R81, R81.10

    Example:
    [Expert@HostName:0]# $MDS_FWDIR/scripts/migrate_server verify -skip_upgrade_tools_check -v R80.40

EXPORT
  • The Export command should be:

    [Expert@HostName:0]# $MDS_FWDIR/scripts/migrate_server export -skip_upgrade_tools_check -v <Target Version> <Path and Name of the Export TGZ file>

    Example:
    [Expert@HostName:0]# $MDS_FWDIR/scripts/migrate_server export -skip_upgrade_tools_check -v R80.40 /var/log/Export_for_Upgrade_from_R8020_to_R8040.tgz

IMPORT
  • The Import command should be:

    [Expert@HostName:0]# $MDS_FWDIR/scripts/migrate_server import -skip_upgrade_tools_check -v <Target Version> <Path and Name of the Exported TGZ file>

    Example:
    [Expert@HostName:0]# $MDS_FWDIR/scripts/migrate_server import -skip_upgrade_tools_check -v R80.40 /var/log/Export_for_Upgrade_from_R8020_to_R8040.tgz

Monday, November 22, 2021

 CHECKPOINT - CPUSE install latest agent version    

Here is a procedure to manually upgrade CPUSE agent

First check agent build:


  • Connect to command line on Gaia machine.
  • Log in to Expert mode.
  • Run this command:[Expert@HostName:0]# cpvinfo $DADIR/bin/DAService | grep -E " Build|Minor "

Example output:

Build Number = 1523
Minor Release = knockout_ms1_ga


Then we need to download the latest DeploymentAgent_<build>.tgz  package to the machine (see sk92449)

  • Transfer the CPUSE Agent package (DeploymentAgent_<build>.tgz) to the machine (into some directory – e.g., /some_path_to_CPUSE/).
  • Unpack the CPUSE Agent package:

    [Expert@HostName:0]# cd /some_path_to_CPUSE/
    [Expert@HostName:0]# tar -zxvf DeploymentAgent_<build>.tgz

  • Install the CPUSE Agent RPM:

    [Expert@HostName:0]# rpm -Uhv –-force CPda-00-00.i386.rpm


After these operations check again the Build number with above command


Monday, March 8, 2021

CHECKPOINT -- new commands in Dynamic CLISH

 Since release R80.10 Dynamic CLISH was introduced to extend CLISH functionality

with this feature some commands ,available in EXPERT mode, are no longer available in CLISH (deprecated)

These commands are deprecated and thus unavailable


  • cpinfo
  • cplic
  • fw ips
  • raidconfig
  • fwaccel
  • cphaprob

Here is complete list of new commands


Monday, January 14, 2019

Import Certificate on Windows IIS

Finally you have chosen IIS

Import your certificate in the 'awesome' windows IIS


OK, maybe you are enforced to use IIS as web server, then, i would like to know you that my thoughts are with you.

So, let's see how to import an owned certificate in IIS environment.

Apllication and files needed:
- OpenSSL (http://www.openssl.org/)
- Certificate (.crt) file
- Private key (.key) file

Are you ready? I hope it...

1- First of all we should create a .pfx file (certificate + private key).
2- Locate your .crt and .key file.
3- Using OpenSSL:
openssl pkcs12 -export -out certificate.pfx -inkey privateKey.key -in certificate.crt -certfile more.crt
where:
      - pkcs12 - utility for PCKS#12 files in OpenSSL
      - -export -out certificate.pfx - export and save the PFX file as certificate.pfx
      - privateKey.key - your private key
      - certificate.crt - use certificate.crt as the certificate the private key will be combined with
      - -certfile more.crt – This is optional, this is if you have any additional certificates you would like to      include in the PFX file.
4- When running the above command, you are required to generate a password for exporting file, please don't forget it.
5- You will see a new file, named 'certificate.pfx'.
6- Open IIS dashboard, then in Connections column select your server.
7- Click, on central part of window, Server Certificates icon.


8- After open it, stroke a right click and chose import from 'Actions' menu.


9- Select your newly created 'certificate.pfx' and write your export password down.
10- Click OK.

Now, you are able to see your certificate in the list, so, you can choose it in Sites/Bindings section.


Thanks to: ssl.com


Wednesday, November 21, 2018

Checkpoint smartcenter - manage size of $FWDIR/log/postgres.elg

In the last few months I have started migrating to R80.10 software and I found an interesting issue with the postgres sql database on smartcenter
No rotation of log file has been added to /etc/cpshell/log_rotation.conf so file , over time, can grow to any size until it fills up all disk space

Simple work around until Checkpoint fixes it


  • edit /etc/cpshell/log_rotation.conf file adding this line 
  • log_start list to verify that your change is visible 
  • cpstop && cpstart on management 
If $FWDIR/log/postgres.elg file is way too BIG I did this fix:

after cpstop you issue cat /dev/null > $FWDIR/log/postgres.elg and file is zeroed


Friday, September 28, 2018

Checkpoint how to clear all tables of IA

The following command  clears all pdp and pep tables on security gateway:

fw tab -t pdp_sessions -t pdp_super_sessions -t pdp_super_sessions -t pdp_encryption_keys -t pdp_whitelist -t pdp_timers -t
pdp_expired_timers -t pdp_ip -t pdp_net_reg -t pdp_net_db -t pdp_cluster_stat -t pep_pdp_db -t pep_networks_to_pdp_db -t
pep_net_reg -t pep_reported_network_masks_db -t pep_port_range_db -t pep_async_id_calls -t pep_client_db -t
pep_identity_index -t pep_revoked_key_clients -t pep_src_mapping_db -t pep_log_completion -x -y


 This commands causes temporary disconnection for all traffic passing the firewall, so use it with caution

Wednesday, April 18, 2018

Checkpoint firewall reimaging via USB disk --- ISOMORPHIC

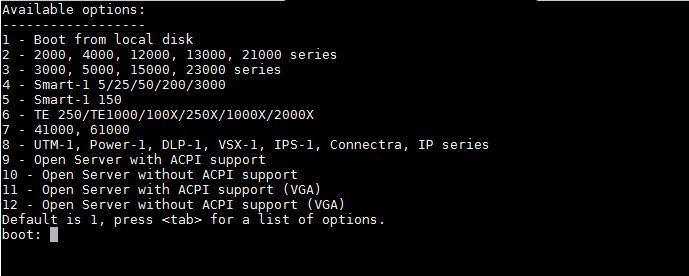
Just as a reminder of the options when the serial cable connection messes up the screen


R80.40 Menu

Available options:
------------------
1 - Boot from local disk
2 - 2000, 4000, 12000, 13000, 21000 series
3 - 3000, 5000, 6000, 15000, 16000, 23000, 26000 series
4 - Smart-1 5/25/50/200/400/525/625/3000/5050/5150
5 - Smart-1 150
6 - TE 250/TE1000/100X/250X/1000X/2000X
7 - 41000, 44000, 61000, 64000
8 - UTM-1, Power-1, DLP-1, VSX-1, IPS-1, Connectra, IP series
9 - Open Server with ACPI support
10 - Open Server without ACPI support
11 - Open Server with ACPI support (VGA)
12 - Open Server without ACPI support (VGA)
Default is 1, press <tab> for a list of options.


R81 & R81.10 Menu

Available options:
------------------
1 - Boot from local disk
2 - 2000, 4000, 12000, 13000, 21000 series
3 - 3000, 5000, 6000, 7000, 15000, 16000, 23000, 26000, 28000 series
4 - Smart-1 5/25/50/200/400/525/625/3000/5050/5150
5 - Smart-1 150
6 - TE 250/TE1000/100X/250X/1000X/2000X
7 - 41000, 44000, 61000, 64000
8 - UTM-1, Power-1, DLP-1, VSX-1, IPS-1, Connectra, IP series
9 - Open Server with ACPI support
10 - Open Server without ACPI support
11 - Open Server with ACPI support (VGA)
12 - Open Server without ACPI support (VGA)
Default is 1, press <tab> for a list of options.


R81.20 menu

Available options:
------------------
1 - Boot from local disk
2 - 2000, 4000, 12000, 13000, 21000 series
3 - 3000, 5000, 6000, 7000, 15000, 16000, 23000, 26000, 28000 series
4 - Smart-1 5/25/50/200/400/525/600/625/3000/5000/6000
5 - Smart-1 150
6 - TE 100X/250X/250XN/1000X/2000X/2000XN
7 - 41000, 44000, 61000, 64000
8 - UTM-1, Power-1, DLP-1, VSX-1, IPS-1, Connectra, IP series
9 - Open Server with ACPI support
10 - Open Server without ACPI support
11 - Open Server with ACPI support (VGA)
12 - Open Server without ACPI support (VGA)
Default is 1, press <tab> for a list of options.


Monday, November 27, 2017

Top CheckPoint CLI commands

This post is a summary of some of the most important Checkpoint commands taken by Checkpoint Community (CheckMates)


fw ctl zdebug drop used to quickly see all dropped connections and more importantly the reason (e.g. anti-spoofing, IPS , FW rule , ....). USE WITH EXTREME CAUTION 
cpstat fw quickly see stats of number of connections (accepted,denied,logged) with a breakdown
if the FW was under a high load i would usually run " watch --interval=1 'cpstat fw' " (would see a real-time to see the interface that is causing this)
fw tab -s -t connections


allowed me to quickly see how much load is (and was i.e "peak" ) on the FW
cphaprob stat used to see state of cluster
fwaccel stats -s to check acceleration status on FW
cphaprob -a if


used to do troubleshooting cluster, verify all interfaces are UP and the Virtual IP address for the cluster interfaces

Friday, October 20, 2017

Policy installation failed after cluster configuration

A few day ago, I've created a new cluster on a mgmt that already manage other clusters.

On this new cluster the only interface configured was the MGMT, the other interfaces were all in shut and not configured, so in topology I defined the MGMT interface as cluster interface.

After creation of the cluster I tried to install policy and the policy installation failed.

This is a classic issue, the cluster always needs a sync interface so in topology I changed the interface and defined it as Sync, although it's not sync if.

After this change everything was ok and I was able to install policy.

Sunday, August 20, 2017

Easy ways to get your IP address on a Linux box

Here are some easy ways to obtain your IP address on a Linux box


  • dig +short myip.opendns.com @resolver1.opendns.com
  • curl -s http://whatismyip.akamai.com/
  • curl -s icanhazip.com


Tuesday, July 18, 2017

Checkpoint R80.10 management upgrade

When you decide to upgrade your R77.30 Checkpoint management to R80.10 please keep in mind a number of points ( also reported in sk114739).

The first step of the upgrade process will run the Pre-Upgrade verification tool ( that you could also run by downloading the utilities from CP website).

  • One typical error, if you are not from the US, is to have non-Unicode chars in multiple files. In R80 you had to fix all these issues. Now with R80.10 all you need to do is create a file $FWDIRconf/db_encoding.txt with your encoding ( i.e. WINDOWS-1252) and no error message should appear

If you want to know where non-UNICODE chars are you can run this command

grep --color='auto' -P -n "[\x80-\xFF]" file 


  • Next you could have modified files under $FWDIR/lib such as implied_rules.def or crypt.def. These files will be replaced when upgrading.
Thus you need to make a backup of these files and reapply changes after upgrade is completed.

Tuesday, July 11, 2017

How to install Dropbox on a Linux box - headless

here is a brief description of steps to take to install Dropbox client on a Linux box

I followed this article to come up with the commands.

Download and extract software

  • curl -Lo dropbox-linux-x86_64.tar.gz https://www.dropbox.com/download?plat=lnx.x86_64
    • if 32 bit system
    • curl -Lo dropbox-linux-x86.tar.gz https://www.dropbox.com/download?plat=lnx.x86
  • mkdir -p /opt/dropbox
  • tar xzfv dropbox-linux-x86_64.tar.gz --strip 1 -C /opt/dropbox

Start Dropbox client

With the user under whose home directory you want to store Dropbox data, start the Dropbox daemon
  • sudo su - dropboxuser
  • /opt/dropbox/dropboxd

Now you need to link system to Dropbox


Host ID Link:
This computer isn't linked to any Dropbox account...
Please visit https://www.dropbox.com/cli_link_nonce?nonce=ac8d12e1f59913758348392949c265eb to link this device

Browse to above link and enter credentials for the Dropbox user you want to use


Link success output:
This computer is now linked to Dropbox. Welcome John

Start Dropbox as a service . Download init script

  • cd ~
  • curl -o /etc/init.d/dropbox https://gist.githubusercontent.com/thisismitch/d0133d91452585ae2adc/raw/699e7909bdae922201b8069fde3011bbf2062048/dropbox
  • chmod +x /etc/init.d/dropbox
Select Linux user that will be used to sync Dropbox data

  • vi /etc/defaults/dropbox
DROPBOX_USERS="john"

Start dropbox

  • service dropbox start
  • update-rc.d dropbox defaults


Forescout CounterACT - license clear

here is the list of commands to run to clear license info on CounterACT 7.0


  1. fstool service stop 
  2. fstool clear_license
  3. fstool service start
after this commands it is possible to install license file from scratch

Monday, July 10, 2017

Tenable Nessus backup and restore

If you are using the Tenable Nessus product to run vulnerability assessments, you probably make a lot of tuning and configuring on policies
If you want to make sure that you do not lose all your work you have to backup a number of files.
A while ago I opened a case with Tenable support and was given a procedure to run
Here is what you need to do for backup :


  1. Backup /opt/nessus on existing system
That's easy

Now to restore, you cannot simply restore all files because Nessus will complain about license violation and will get nowhere

So here is what I did:

  1. go to Tenable portal and reset the Activation code
  2. install Nessus software from package
  3. Restore the following files from your backup (copy, do not move)

    in /opt/nessus/var/nessus, restore the following:

    /users folder
    policies.db
    Master.key
    Global.db                   --- could not find it on 6.8.* version
    global.db-wal
    global.db-shm

    in /opt/nessus/etc/nessus restore the following (these may be the only files in this directory):

    nessus-fetch.db
    nessusd.db
    nessusd.conf.imported
    nessusd.rules
  4. Run the following commands:

    # /opt/nessus/sbin/nessuscli fetch --register YOURACTIVATIONCODE
    # /opt/nessus/sbin/nessusd –R
    #service nessusd start
I had to reboot the system after running /opt/nessus/sbin/nessusd –R as it seemed to never end


Issue with ePo database indexes before upgrade to ePO 5.9

When you upgrade ePO server to version 5.9, you may have the following warning:

"ePo database indexes are fragmented. Rebuild the index before upgrading"

To resolve this problem open SQL management studio and run this query on your ePO database to extract all index with a percentage of fragmentation greater than 30% :

SELECT OBJECT_NAME(ind.OBJECT_ID) AS TableName,
ind.name AS IndexName, indexstats.index_type_desc AS IndexType,
indexstats.avg_fragmentation_in_percent
FROM sys.dm_db_index_physical_stats(DB_ID(), NULL, NULL, NULL, NULL) indexstats
INNER JOIN sys.indexes ind
ON ind.object_id = indexstats.object_id
AND ind.index_id = indexstats.index_id
WHERE indexstats.avg_fragmentation_in_percent > 30
ORDER BY indexstats.avg_fragmentation_in_percent DES

In order to reduce fragmentation we will have to rebuild the indexes, so run this query to rebuild index

Declare @TBname nvarchar(255),
        @SQL nvarchar(max)

select @TBname = min(TABLE_NAME) from INFORMATION_SCHEMA.TABLES WHERE TABLE_TYPE='BASE TABLE'

while @TBname is not null

BEGIN
    set @SQL='ALTER INDEX ALL ON [' + @TBname + '] REBUILD;'
    --print @SQL
    EXEC SP_EXECUTESQL @SQL
    select @TBname = min(TABLE_NAME) from INFORMATION_SCHEMA.TABLES WHERE TABLE_TYPE='BASE TABLE' and TABLE_NAME > @TBname        
END

Now you can restart the upgrade wizard without index problem.

Wednesday, July 5, 2017

Useful commands for mysql server

here are some useful commands to manage mysql server I always have to google for.

reset root password

sudo /etc/init.d/mysql stop
/usr/sbin/mysqld --skip-grant-tables --skip-networking &
mysql -u root
   FLUSH PRIVILEGES;
   SET PASSWORD FOR root@'localhost' = PASSWORD('password');
   FLUSH PRIVILEGES;
   exit;

kill %1 (to kill mysql server)

service mysql start

add user and grant full access to selectedDB

CREATE USER 'newuser'@'localhost' IDENTIFIED BY 'complexpassword';
GRANT ALL PRIVILEGES ON selectedDB . * TO 'newuser'@'localhost';

restore data from dump

from mysql client - delete database
drop database selectedDB; 

restore database from command line

mysql -u root -p selectedDB  < dump.sql

delete record from table

mysql> use MYDB;
Database changed

mysql> DELETE FROM tutorial_tbl WHERE tutorial_id=3;
Query OK, 1 row affected (0.23 sec)

mysql>

Wednesday, April 12, 2017

openssl to test SMTP TLS

Here is the openssl command to test SMTP TLS on a SMTP server


 openssl s_client -connect mx1.mediasecure.it:25 -starttls smtp


The output from the command will tell you if STARTTLS is supported on the remote SMTP server and will also provide information about the certificate that is used .

CONNECTED(00000003)
depth=0 OU = Domain Control Validated, CN = *.mediasecure.it
verify error:num=20:unable to get local issuer certificate
verify return:1
depth=0 OU = Domain Control Validated, CN = *.mediasecure.it
verify error:num=27:certificate not trusted
verify return:1
depth=0 OU = Domain Control Validated, CN = *.mediasecure.it
verify error:num=21:unable to verify the first certificate
verify return:1
---
Certificate chain
 0 s:/OU=Domain Control Validated/CN=*.mediasecure.it
   i:/C=US/ST=Arizona/L=Scottsdale/O=GoDaddy.com, Inc./OU=http://certs.godaddy.com/repository//CN=Go Daddy Secure Certificate Authority - G2
---
Server certificate
-----BEGIN CERTIFICATE-----
MIIFNTCCBB2gAwIBAgIIItbq63hVx0IwDQYJKoZIhvcNAQELBQAwgbQxCzAJBgNV
BAYTAlVTMRAwDgYDVQQIEwdBcml6b25hMRMwEQYDVQQHEwpTY290dHNkYWxlMRow
GAYDVQQKExFHb0RhZGR5LmNvbSwgSW5jLjEtMCsGA1UECxMkaHR0cDovL2NlcnRz
LmdvZGFkZHkuY29tL3JlcG9zaXRvcnkvMTMwMQYDVQQDEypHbyBEYWRkeSBTZWN1
.........
-----END CERTIFICATE-----
subject=/OU=Domain Control Validated/CN=*.mediasecure.it
issuer=/C=US/ST=Arizona/L=Scottsdale/O=GoDaddy.com, Inc./OU=http://certs.godaddy.com/repository//CN=Go Daddy Secure Certificate Authority - G2
---
No client certificate CA names sent
---
SSL handshake has read 1732 bytes and written 656 bytes
---
New, TLSv1/SSLv3, Cipher is AES256-SHA
Server public key is 2048 bit
Secure Renegotiation IS supported
Compression: NONE
Expansion: NONE
SSL-Session:
    Protocol  : TLSv1
    Cipher    : AES256-SHA
    Session-ID: 25FEEE4C06B1E4F47CE3E1B9A991ADBE62713D9B192BB4DE8A7977E92D193AC3
    Session-ID-ctx:
    Master-Key: 15827DE828099C0A4E7CEAAB8C8E7300FC8EC8753939CBA5B8E44F75356DA421AFA71D32B6E7BEF883184A40575F1348
    Key-Arg   : None
    PSK identity: None
    PSK identity hint: None
    SRP username: None
    Start Time: 1491980164
    Timeout   : 300 (sec)
    Verify return code: 21 (unable to verify the first certificate)
---
250 HELP
helo t.rr.t

Tuesday, March 14, 2017

CheckPoint CPUSE agent issues - No packages displayed


In some cases, when you try to upgrade Gaia at R77.30, you can find yourself in this situation:

gw-8d875c> installer download
**             ************************************************************************* **
**                         Connection error. Packages list might be incomplete           **
**             ************************************************************************* **
Show packages: no packages to display

I try to reboot the firewall to fix this problem, but it persists.

If I check the installer status an error is reported on Network connection

Install Gaia R77.30 on Lenovo server X3650 M5

A few days ago I had to install a checkpoint cluster with two server Lenovo System x3650 M5.
I downloaded the Gaia R77.30 iso file and created a bootable USB flash drive using ISOmorphic.
When I tried to boot  the system from USB I had the following result:

Boot Failed!